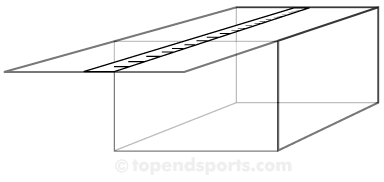
Here are some directions for making your own sit and reach testing apparatus. If you don't want to make your own, you can buy one. See our discussion of sit and reach boxes.
Equipment Required
- Nails or screws, hammer or screwdriver
- Wood glue
- Saw for cutting wood.
- Polyurethane sealer or shellac, brush
- Ruler or tape measure
- Pieces of 3/4" plywood (or other similar sturdy wood or comparable material), cut into the following sizes:
- 2 pieces - 12" x 12" (sides)
- 2 pieces - 12" x 10" (front and back)
- 1 piece - 12" x 21" (top)
 Construction Method
- Assemble the pieces using the nails or screws and wood glue, following the adjacent diagram.
- Inscribe the top panel with 1 centimeter or half inch gradations. It is crucial that the vertical plane against which the participant's feet will be placed is exactly at the zero mark or 23 cm mark (depends of which method you will use, see below).
- Cover the apparatus with two coats of polyurethane sealer or shellac.
- For convenience, you may wish to make a handle by cutting a 1" x 3" hole in the top panel.
Now you are ready to conduct the Sit and Reach test.
Measurement Scale
There are two different sit and reach box measurement methods. In one, the level of the feet is marked as zero, and any score less than that is recorded as a negative number, and any result past the toes is recorded as a positive number. In the other method, which is popular in some regions, the level of the feet is recorded as 9 inches or 23cm. The means that all results are usually recorded as a positive number, which has its benefits. See the sit and reach test variations.
Related Pages
- Our discussion of available sit and reach boxes.
- General procedure for measuring flexibility using the Sit and Reach test
- About flexibility testing
- Buy a sit and reach box
- Make Your Own Vertical Jump Tester


 Upcoming Events